
Making Starter
Did you know you can make your own starter?!!

Making Starter!
Did you know you can make your own starter?!!
My initial love for sourdough came from two places.
The first was my interest in bacteria. I was working on my thesis which was all about bacteria in the body (mostly probiotics) and I was completely fascinated by the concept that you could actually “trap” bacteria in the air into a “starter” and that starter could be used to make bread rise.
The other “calling” in my life was to help care for my husband who was battling Stage 4 colon cancer.
Each time he had a chemotherapy session he lost most of his appetite, but this bread was one of the few things he could keep down.
It became a labor of love that, and sourdough will always hold a special place in my heart.
"Wait, what?"...
I thought sourdough starter was like some sort of 150-year-old family heirloom passed from generation to generation!!”
Nope!
Not even close!
Well I suppose to some people it is … but you can actually make it yourself!
All you need is flour, water, and a little patience while the bacteria in the air takes up residence in your mixture!
What makes sourdough different from commercial bread is the natural yeast that ferments the flour.
This fermentation process helps to breakdown the gluten making the bread more digestible. There are also phytic acids in grains that bind healthy minerals like zinc, iron, and calcium. The bacteria degrade the phytates which then improves the bioavailability of minerals in sourdough!
Now let’s be honest, white flour is NOT healthy...but boy does it taste good!!!

Here's all you'll need:
1/2 cup whole wheat flour
1/4 cup of water

1/2 cup whole wheat flour
1/4 cup of water
That’s each.
Just mix them together in a jar and cover with a thin cloth for 2 days.
(Start with whole wheat flour which has the nutrients that attracts the bacteria from the air.)
On the third day you will discard half of the starter (which is sooo hard, but you can use it in something like pancakes).
Then feed it 1/2 cup flour and 1/4 cup water.
You’re going to do this exact process (discarding and feeding) everyday for an additional 4 days! I’ll admit I had more success when I switched to white flour on day 7.
Once it’s nice and bubbly and growing after a feeding you’re all set to make bread!
Don’t be concerned if your starter has a funky smell, or even if you see mold form.
Your starter is still trying to get the right balance of the “good bacteria”.
Just keep going. Sometimes it can take up to 14 days for it to get nice and bubbly.
If you see mold in your jar, just scrape it off, and try to transfer some of the starter to a new clean jar …and keep going!
The Steps

The Process
So here is what your schedule is going to look like:
Day 1: 60g whole wheat flour (about 1/2cup) + 60g water (about 1/4cup)
Day 2: Do nothing
Day 3: Discard half of your starter and feed 60g wheat flour + 60g water
Day 4: Discard half of your starter and feed 60g wheat flour + 60g water
Day 5: Discard half of your starter and feed 60g wheat flour + 60g water
Day 6: Discard half of your starter and feed 60g wheat flour + 60g water
Day 7: Discard half of your starter and feed 60g white flour + 60g water
The hardest part is discarding part of your starter.
Here’s why it’s necessary.
As the bacteria feeds off of the wheat, it multiplies, and when it does, there is more bacteria fighting for food.
So you get rid of half. As an alternative, you could just keep feeding it loads of fresh flour and water, but you would very quickly end up with A LOT of starter.
Your jar will be kept at room temperature. By day 7 (or maybe a bit longer) it should be nice and bubbly and ready to use.
At this point I like to switch to feeing it white flour, which I find makes it a lot easier to take care of.
There are more nutrients in wheat flour, which the bacteria love, but it will ferment much quicker which can be difficult to maintain for beginners.
At this point you can decide if you would like to proceed with a your feeding routine (and start baking if you’re sure it’s nice and bubbly), or if you want to put it in the fridge (so you can take a break from the feeding).
If left at room temperature, the starter needs to be fed daily. Otherwise simply refrigerate it and feed it weekly (remembering to discard some of it).
I’ll repeat, “Feed it each day or stick it in the fridge and feed once a week!”
Note: Room temperature creates an “active” starter, and refrigeration makes it “dormant”.

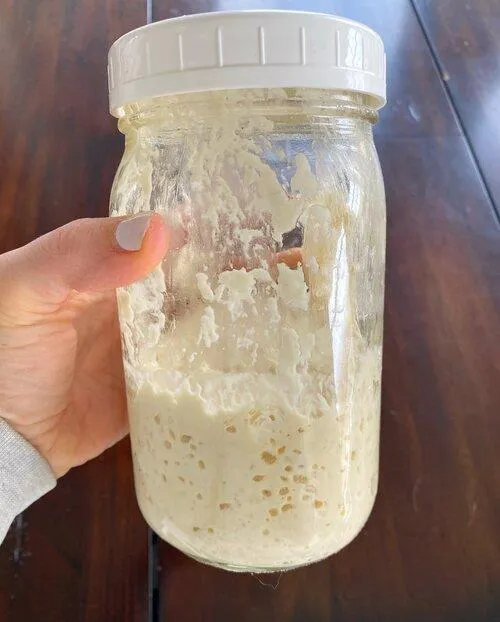
You are looking for lots of bubbles!
You’ll know your starter is ready when you have lots of bubbles and when your starter “rises” after a feeding. Some people like to use a rubber band to mark where the starter is and to see if it “rose” above the line after a feeding.
Here is a video showing you how to take care of your starter.
Riverton, UT
Email: charitylighten@gmail.com
